- Microsoft Office 2010
- Microsoft Office 2013
- Open any of the said programs - I'm using Word.
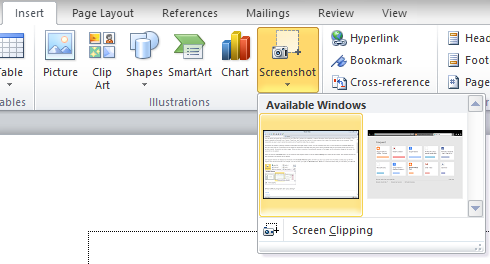
- Go to the Insert Tab - Find the Screenshot option.
- Now hit on the drop down arrow beneath Screenshot option
- If you've some other windows open in desktop, you will see those in Available Windows - Choose one of them to directly insert that screenshot.
- If you don't see your necessary window in the list, then you've to hit on the Screen Clipping option.
- Now your document will be minimized and you will get a cross pointer > Select the necessary part of your screen > That part will be directly added to your file
Tips:
Sometimes, it could be difficult for you to operate this tool properly. To avoid difficulties, you must know the following tips:
- If you need to capture the screenshot of your desktop only, then keep all other programs either closed or minimized except the program from which you're taking screenshot - Suppose MS Word.
- You can also capture the part of your current program. Suppose you're clipping from MS Word and you've to take the screenshot of this program. When you hit on the Screen Clipping option, MS Word will be minimized - You will get 1 second to restore it. Then you will be able to capture the running document.
- If you wanna take the screenshot of a particular program, you must keep that program running - Make sure the window of that program is running - It shouldn't be minimized - Thus you can find that program in the list of Available Windows.
- If you have multiple windows open on your desktop, only maximize the window which you wanna capture - Keep all other windows minimized or closed.
- Remember, After hitting the Screen Clipping button from the Screenshot option, you will get near about 1 second to choose any screen - Within this time, you've to minimize or maximize a program that you would like to capture.
- You can also save the image after clipping a screen. Right click on the clipped image, then choose Save Picture As > Choose Picture Type > Name the Picture > Save the Picture on your hard disk. Applies to MS Word only.
Good to Know:
If you wanna add any previously stored image from your hard disk in your document, then hit on the Insert Tab > Select Picture option > Choose your picture.
Hopefully these tips will be helpful for you. If you face any problem - Leave a comment below.

No comments:
Post a Comment