
If you're a regular visitor of Marks PC Solution you should notice, we've published lots of tutorials on Microsoft Windows, Microsoft Office and other software. We've also published many tutorials and tips regarding security issues. You can find those tips by using the search box. Or you can search by categories: Tips n Tricks, Tutorials, Microsoft, Windows, Security etc. Today, I would like to share another tips on security.
Many of you might be familiar with the password protection system of Microsoft Office. If you're working with highly confidential documents, workbooks and presentations (ie. Exam Questions, Online Account Information, Personal Information, Other Secret files), then this is a good idea to encrypt those files by password.
But if you are not acquainted with the password protection system you should go through the whole post. You should know, the different versions of MS Office keeps the password option differently. You will not find it similar in Office 2003, 2007 and 2010. That could be difficult for you to find the password option. That's why I'm gonna discuss about all versions. :)
Note: The procedure is very similar in MS Word, Excel and PowerPoint.
Setting Password in MS Office Documents
Office XP and 2003:
These two versions are almost similar. All the options and tools are located at the same place. Maybe they are different just by color! Let's start -
Open MS Office Document (Word/ Excel/ PowerPoint) > Go to Tools Menu > Select Options > Hit on the Security Tab > Type your Password on Password to Open Box > Hit OK > Save the Document.
Now whenever you will open the document, first you have to enter the password. Then you will be able to access the file.
I apologize for not sharing any image. I don't use 2003 anymore. I have been using Office 2010 for last two years. But this is very easy. You will have no problem to set password in Office 2003. Upgrade to Office 2010 or 2013 to enjoy exiting features!
Office 2007:
You know Office 2007 brings a dramatic change in the interface. Its ribbon interface is absolutely different from Office 2003 or XP. But Office 2010 and 2007 are almost similar except small changes in few options. Okay start -
Open any of the Office Programs (Word, Excel or PowerPoint) > Now hit on the Office button from the top left corner > Choose Prepare and then Select Encrypt Document > A small Password box will appear > Type the Password > Hit OK > and then Confirm it > Save the Document.
Look at the image below:

Office 2010:
Though Office 2007 and 2010 are very similar, but there are some significant changes in some of the options. A major change is the disappearance of the Office button. Instead of Office button, you will see the File button in 2010. See how to do -
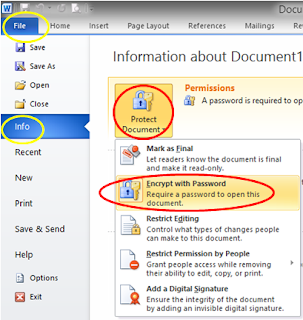
Open either Word, Excel or PowerPoint file > Click on the File button from the upper-left corner > Choose Info > Hit on the Protect Document from Permission section > Choose Encrypt with Password > Type your desired Password in the box and hit OK > Type again to confirm it > OK > Save the Document.
You can take help of the image below:
Note: If you don't save the document after setting the password, then it will be removed automatically. Password will be enabled after saving the document. And remember, this password has no recovery options as you can do in Gmail, Yahoo or Facebook! So be careful!
Removing/ Changing the Password
Sometimes you may set a password for testing purpose only. For example you set password in a document that doesn't need password at all. And every time you're required to type it when accessing that file. Or maybe you want to change it. But when you try to remove or change that password you can't find any option to remove it. How disgusting! :)
Well this is easier than you think! If you wanna change the password then repeat the whole process again until the password box appears. Then type a different password and save the document.
And if you would like to remove the password then just leave that box blank and save the document. Password will be removed.

Hopefully this post will be helpful for you . . . :)
thanks a lot
ReplyDelete