Add your Signature to Gmail Messages


Add Gmail Signature with your mail


Many of you might be familiar with the Auto Signature feature of Gmail. But you need to add this manually and it requires to be turned on by the user himself. Let's see how to add this . . . 


About Gmail Signature

When we write a letter to someone, we normally sign at the end of that letter. In case of email messages, signing is not that important. 

But in case of official email messages, we usually mention our name, designation and organization. 

But you don't need to do this manually every time. If you type few words (what may be included as signature) in the signature option and enable it, Gmail will do the rest automatically.


Settings Option in Gmail


Add your Signature

  1. Sign in to your Gmail ID.
  2. Hit on the Settings Gear Settings Icon from the top right corner and choose Settings.
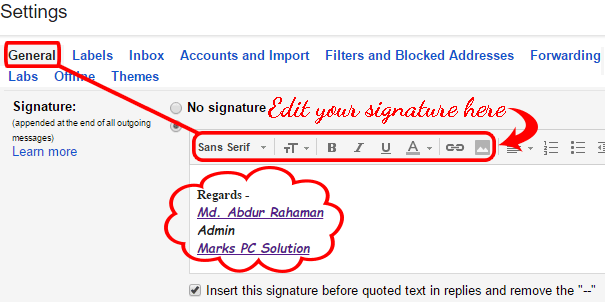
  3. Now make sure you're in the General tab.
  4. There are lots of options under General. Scroll down and find the option - Signature.
  5. By default, No Signature option might be selected. You've to select the next radio button to enable it.
  6. Now type few words in the box as your signature. You can articulate your text with the help of formatting options. You can also upload image or create hyperlink here.
  7. When you're done, scroll down to the bottom. Hit on the Save Changes button. 
  8. Finally, hit on the  COMPOSE  button and see the result!


Hit on the following button to directly go to the Gmail Settings . . .

One Click to Open Gmail Settings


Settings > General > Signature > Type your Signature . . .


Settings > General > Signature


Tips: you can also use your real signature here! Sign on a paper > Scan & upload it as image!


Hit on the Compose button to send a new message > Your signature texts will appear as shown below.


Automatic Signature in Gmail Message


Hopefully, this tutorial will help you all. If you need even more stuffs regarding signature option, then follow Gmail Help page . . .


Thanks for visiting!


Stay with Marks PC Solution to get more interesting IT topics!


Comments

Popular posts from this blog

GTA San Andreas Cheat Code (PDF)

After Vice City, San Andreas is the most popular game released by Grand Theft Auto (GTA). Usually GTA releases role playing game. San Andreas is such a game where you can act like a person. You can do everything. You have to take part in missions and complete them.  To make your missions easier, there are lots of cheat codes. If you can properly apply these codes, the tough parts of the game will be easier. Cheat codes are somewhat like keyboard shortcuts of computer programs.  I've shared 63 cheat codes below. There were more cheat codes in my collection, but I've omitted the less important cheats. Effects or result of the cheats are on the left side, and the codes are on the right side.  You can copy the following codes in your PC. And for your convenience, I've also uploaded a PDF file of these codes. You will find the download link at the bottom.  Effect Cheat Code Adrenaline Mode MUNASEF All Cars Explode ALL...

Office 2016 Activator (KMSPico 10.1.5)

It's been couple of months after the release of final version of Microsoft Office 2016. And maybe you're tired of finding for a working activator for this version. Today I'm gonna share Office 2016 activator with you - no more waiting!! About the Activator   Name: KMSPico 10.1.5 File Size: 3 MB (Approx) File Type: Zipped Folder 100% Neat & Clean - No virus! Activating Capacity . . . KMSPico 10.1.5 is successfully leading the KMS world for last few months. If everything is okay, success rate is 100%. This tool has been tested and verified by Marks PC Solution. With this tool, you can activate -  Office 2016, 2013 & 2010 Windows 10, 8.1 & 8 Hopefully this version will work for both 32 bit & 64 bit versions of Windows. Installing Office 2016 Collect/ Download Office 2016 Professional Plus from Microsoft or somewhere else. Install it as trial version without any key. Use the follow...

Rules for Bengali Typing in PDF (Bijoy Layout)

Bijoy is the most popular layout for Bangla typing. The layout was developed by Mostafa Jabbar. He is the pioneer of Bangla typing in computer. More than 90% people use his Bijoy layout for Bangla typing. Today, I'm gonna share a PDF file with you that contains the Bijoy Keyboard layout with English fonts! If your keyboard doesn't have bengali fonts then you can print this PDF file to know where the bengali fonts are located in your keyboard. Additionally this file contains all the necessary rules and tips which are essential for Bangla Typing.  Now there are many other software available for Bangla Typing Layout. Such as Avro Easy, Unicode, Unibijoy etc. And there rules are also somewhat different from Bijoy. And some of their layouts follow the same rules like Bijoy. Hopefully this PDF file will support most of the rules when a layout is similar to Bijoy Layout.  Click to enlarge the image Download the PDF file from the button below. Follow...