Change Dress Color Using Photoshop!!


Change the Color of Dress using Photoshop


Some little tricks of Adobe Photoshop may enable you to perform extraordinary works. Even you can prove yourself as magician to common people. Today I've come with such tricks which will help you to change the color of dress without hurting the background and subject of the image  . . .


Before you start, please have a look at this post also - 


Use Hue/ Saturation to Modify Color in Photoshop


Requirements:
  • Adobe Photoshop (I'm using version CS6)
  • A good quality photo of a person
  • Basic knowledge of Photoshop


Step 1  |  Choose an Image


Rizwana Rahman Mou


Step 2  |  Change the Color


Open your image using Photoshop. And do the following tasks - 
  • Go to the Image Menu > Adjustment > Hue/ Saturation  [Ctrl + U]
  • Move the Hue slider to left or right.
  • Also move the Saturation and Lightness slider (Optional)
When you get the desired dress color, hit OK. 


Hue/ Saturation Window in Photoshop CS6


I've used 100 in Hue option and left the other fields as they are. It brings me the following result:


Change the Color of Image in Photoshop


Now compare it with the first image. This lady got a completely new dress. But Oh My God! What happened to her face and skin? And what about the background? 


Okay we've nothing to worry about until we have Photoshop. Now I've to take some parts of this image back to its original look. 


Step 3  |  History Brush Tool


At this step, we've to do some works manually. Except the dress, other parts of the image (Face, Hair, Skin & Image background) should be taken to their previous stage.


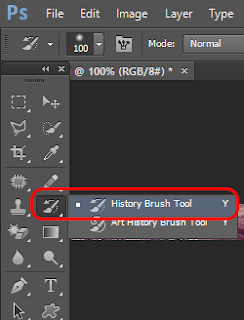
History Brush Tool Option in Photoshop


Look at the above Tool of Photoshop. This is our Trump Card. With this History Brush Tool, you can simply paint the area that needs to be backed to its previous stage. 

The keyboard shortcut of this tool is Y.


As soon as you choose History Brush Tool, you will get a circle. Start painting over your image. Press this key  [  to decrease the brush size and press this  ]  to increase.


History Brush Tool to Change Image History


Here I've just touched the upper left corner of the image. After painting the whole area except the dress, the final result is as below - 


Rizwana Rahman


I've edited this image within a very short time. But if you practice properly and spend little more time, hopefully you will get much better result.


Hope it will help you all. In my next post, I will write more on History Brush Tool. Till then, stay with Marks PC . . .


Caution!

No photo of this tutorial can be used anywhere in the web, print or any other media.


Model: Rizwana, Computer Engineer.


Stay with Marks PC Solution to get more interesting IT topics!


Comments

Popular posts from this blog

GTA San Andreas Cheat Code (PDF)

After Vice City, San Andreas is the most popular game released by Grand Theft Auto (GTA). Usually GTA releases role playing game. San Andreas is such a game where you can act like a person. You can do everything. You have to take part in missions and complete them.  To make your missions easier, there are lots of cheat codes. If you can properly apply these codes, the tough parts of the game will be easier. Cheat codes are somewhat like keyboard shortcuts of computer programs.  I've shared 63 cheat codes below. There were more cheat codes in my collection, but I've omitted the less important cheats. Effects or result of the cheats are on the left side, and the codes are on the right side.  You can copy the following codes in your PC. And for your convenience, I've also uploaded a PDF file of these codes. You will find the download link at the bottom.  Effect Cheat Code Adrenaline Mode MUNASEF All Cars Explode ALL...

Joining Texts from Multiple Cells in Excel

  Programs like MS Excel is full of functions. There are many useful functions that we don't use or we don't know about. One of them is CONCATENATE. It means joining or linking. With this function you can join texts from multiple cells. Let's see how . . . Suppose you're working in an Excel Worksheet where you need to combine texts from different cells. I'm gonna show you an example. Let's consider the image below -    What do you see ? I've imputed First Name and Last Name. In Full Name column I've used the formula i.e. CONCATENATE. And in the last column I've added Mr. with the full name.    So how do you use this formula ? Here it is -  =CONCATENATE(A2," ",B2) Observe it carefully. You can add more than 02 cells with this functions. Here I've just used 02 cells. You may think what is this " " for ? You may notice that there is a space between the two i.e. " & ".  If you don't use " " then you...

Running Total/ Cumulative Sum in Excel

  Hey Guys! You should have noticed that I'm writing on MS Excel for last few days! To be honest I'm trying to learn some simple and useful tricks of Excel. And I'm also trying to share my knowledge with you. In this post I've come with such a little trick which maybe very useful if you face such situation. Let's begin . . .    Running Total/ Cumulative Sum It means the summation of numbers in a list and it will be updated each time when a number is added or changes. Look at the image below -    Look at the image. There are two columns with numbers. The first one is simply the number list. But the 2nd one is the summation of the list. Each time a new number is added to the first column the second one shows the summation. How to do this?  It's not a magic. Very simple sum formula is used to perform this task. But there is a little trick. You just need to lock the first cell and then every time it will update the running total list.  Here is my list. Sim...