Disk Management is a nice tool to manage your hard disk drives. With this tool, you can easily format, shrink and extend your existing volems. You can do some other tasks too. But today I'm gonna discuss about creating new volumes by splitting existing volumes.
Background Story
Two weeks ago, one of my acquaintances got a new laptop. It comes with Windows 8, Intel Core i5 processor and 1 TB Hard disk. Not very extraordinary nowadays. But I was really surprised when heard there is only 1 partition in his laptop!! Can you believe it? One partition for a 1 TB hard disk! My goodness - this is a thousand GB partition!
I know how to split a drive to create new partition. But didn't even try this earlier. After getting the case of 1000 GB partition, I tried to shrink a drive in my own PC. After successfully trying this on my PC, I advised him how to divide the one partition into several drives. By this time maybe he has fixed this. :)
Supported Versions:
Disk Management tool is same both in Windows 7 and 8. Windows XP may have the same advantage but I'm not sure. If XP users has any problem, you can inform be through comments.
Create New Volumes Without Partition - No Restart! No Interruption!!
Make sure you're the Admin of your PC. And right now you're logged in as Administrator. Now start -
- Right click on My Computer icon from desktop. (How to show My Computer icon on desktop)
- Hit on the Manage option.
- Computer Management window will appear.
- Choose Disk Management under the Storage option from the left pane.
- Here you will get the list of your volumes with capacity and free spaces.
- Right click on the drive you wanna shrink.
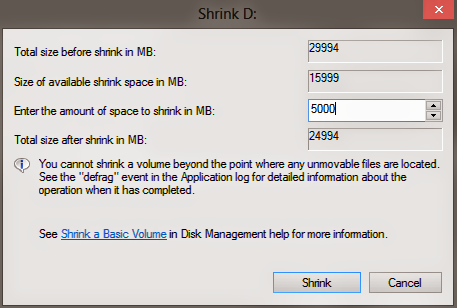
- Select Shrink Volume and you will get the below window.
Here you will get the total size before shrink. Now enter the space to shrink. Simply count the 1000 MB for 1 GB. In the image I've used 5000 MB for 5 GB. Then check how much you will have in the drive after shrink. Before proceed, make sure everything is okay.
Now Press Shrink > You will get the following image > Right click on the Free Space > New Simple Volume > Pres Next > Enter Simple Volume Simple > Next > Assign Drive Letter (Suppose L) > Format the volume (Choose format type, label) > Next > Finish.
Within few seconds, you will get a brand new drive!
How to Get it Back?
Suppose you made a mistake. Or you were just trying to do it. But don't want to divide the volume actually. How do you get the new volume back to your old volume? Very simple!
- Right click on the new volume.
- Choose Delete Volume.
- You will get the above image again.
- Now right click on your old volume and choose Extend volume.
- Press Next > Next > Finish.
This procedure doesn't require any restart. Even you don't need to close any program running on your PC. It's fast, simple and reliable.
Precautions:
While running this operation you should be very careful. Though this tool is safe to use, but you may lose your data for any wrong command. Suppose, you may delete a volume which contains your valuable files. Or you may format an existing partition which contains important data. So, before making a click, be sure you're really doing the right job.
If you have any query, don't forget to leave a comment . . .
Related Topics:


I just want to say a great big Thank you for this tutorial. I brought myself a 2 TB external drive and like your friend I hadn't got it Partitioned. As I needed to do a back up of data from one drive that had given me problems and had crashed on me I just got on with that and completely forgot to put the partitions into place.
ReplyDeleteWell then I came across your post and finally a way that I could partition my drive that I didn't know that you could do it after you had already started to put data onto the drive.
Well I followed the instructions that you had in the tutorial and Bingo as they say I now have my rather large 2 TB HDD Partitioned into nice usable sizes.
All I want to say is again a great big thank you to people like yourself that give your time to help people by showing an easy way around what would a hard thing to do and if anything went wrong with the drive could result in a lot of cussing for not having done the partitioning in the first place .
Thank you Thank you Thank you
It seems that you're really grateful! :)
Delete