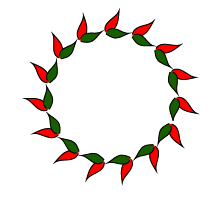
Adobe Illustrator can be compared to a programming tool in that sense, it provides a lots of ways to customize your graphics works. It provides so many designing options which you hardly get in other graphics tools. In this lesson, you will learn how to create amazing brushes within few minutes!
Today I'm gonna talk about how to create custom brushes - Scatter Brush, Art Brush & Pattern Brush. After creating these brushes, you can use them as borders for different shapes such as triangle or oval etc.
Note: This tutorial applies to all versions of Adobe Photoshop. However I've prepared this tutorial using Illustrator CS6.
Okay let's start -
Run Adobe Illustrator from your PC. Now look at the tools panel and find the Paintbrush Tool (See the image on the left). I will create two little objects with this tool which later will be used to create awesome brushes.
Go to the File Menu > New > Create a new document of any size.
Hit on the Paintbrush Tool and draw an object (I sketched something like a leaf) as shown in the image below.
- Now select it through selection tool
- Press Alt key and drag it to create a copy of it.
- Now select the second leaf again and rotate it, place it over the first leaf so that they look like attached.
- Again select the first leaf > Double click on Fill Color from the bottom of tools panel > Choose Red.
- Similarly, select the second leaf and choose green color for it.
- It should look like as below
Now the first but the difficult part has been completed. Now you're ready to have fun in the next step.
Creating Brushes
You will be able to create brushes from the above leaves. First, make sure the brush window is open on your document. Or go to the Window menu and choose Brushes.
- Select both leaves through selection tool
- Go to the Brushes window and click on New Brush Icon (Look at the image below)
- Choose Scatter Brush > Rename it if necessary > Change the values of different fields if necessary > Hit OK
- Again choose New Brush (Leaves must be selected) > Choose Art Brush > You can change the size and direction > Hit OK
- Click on New Brush again > Choose Pattern Brush > Hit OK
- Now you've three custom brushes. Let's apply them :)
Applying the Brushes to Shapes
Before creating shapes, make sure your fill color is white. So that you can clearly understand the effects of different brushes.
Now choose Ellipse Tool (Oval) from the shape. Press Shift key and draw a circle. Now go to the brush window and Apply your newly create Art Brush. The circle will look like as below!
Create another circle. And this time you should test the pattern brush.
How is it? :)
In this way, you can also apply this trick to different shapes such as triangle, star, rectangle etc.
Here I've just illustrated a simple example of customizing the brush. In this system, you can create numerous brush designs. And can you imagine how much designing options are available in whole illustrator? Simply I've no idea. There could be millions!!!
It takes my whole evening to prepare this tutorial. Please inform me whether you like it or not. :)


Comments
Post a Comment