How to Install Windows from USB Disk?


Install Windows from USB device


Today I'm gonna share a very useful tip with you. In this post, you will learn - how to create a bootable USB disk (pen drive) for Windows/ Linux. And this is the easiest way to install Windows from USB disk. Earlier, I wrote about creating bootable Windows disk


If your PC doesn't have a DVD drive, or if your DVD drive is not functioning properly, you can use your pen drive to install Windows. And notebooks don't have DVD drive usually. To install Windows there, you must require a bootable pen drive. 


This post applies to:
  • Windows 7
  • Windows 8
  • Windows 8.1

I haven't tested this technique for Windows XP. Maybe this will also work there. But I'm not 100% sure about XP. 


In order to install Windows from USB Flash Drive, you need the following tools:
  • A USB Flash Drive/ Pen Drive (8 GB Recommended)
  • Rufus - to create bootable USB disk

Step 1 - Get Windows ISO Image

Hopefully, all of you got an 8 GB pen drive. Now your task is to get an ISO image of your Windows. If you have a Windows Installation disk, you can prepare the ISO file using ISO Creator or by Infra Recorder


Step 2 - Create Bootable Disk

Now you've to create a bootable flash drive by Rufus. And then you're ready to install Windows from pen drive! Download Rufus from this link. It's just 616 KB. 

  1. Insert your pen drive. Back up the necessary files  of it (if any). And perform a quick format. 
  2. Run Rufus from your PC just by double click. 
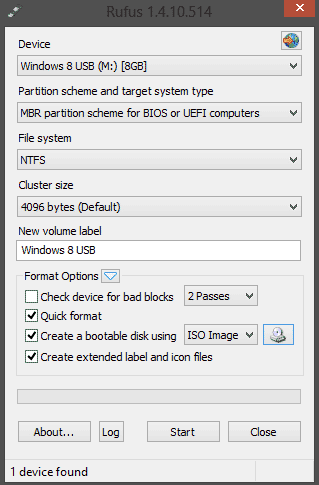
  3. Device - Your pen drive, Partition Scheme - for BIOS and UEFI, File System - NTFS, Cluster Size - Default, Type your Windows Name in Volume > Choose Quick Format > Create a Bootable Disk using ISO Image > Hit on the CD icon and locate your ISO file > Select Extended Labels and Icon Files > Hit on the Start button to launch the operation.
  4. This may take a few minutes. Then you will get a confirmation message. Done! 

You can follow the image below:


Rufust - Creates bootable usb disk


Step 3 - Boot from USB Flash Drive

Restart your system. To access BIOS settings, you need to press F1 in case of Intel Mainboard. Gigabyte users will press Del key. And most other mainboards use F1 key to access to the BIOS utility. 

Now depending on your BIOS version, there could be different interface styles. But the basic option you need to find is - The Boot Priority or The Boot Order

To install the Windows from a USB disk, you need to select - Boot from USB Drive. Now Save and Exit from BIOS. Restart your PC. Now you will see the following message - 


Press any key to boot from USB...


Now press enter to start installing Windows from USB disk! If you face any problem, please leave a comment . . .


Wait a Minute!


When your PC copies files from the disk and restarts, the installation process may start again. If this happens to you, simply remove your pen drive and continue the installation process.



Stay with Marks PC Solution to get more interesting IT topics!


Comments

Popular posts from this blog

GTA San Andreas Cheat Code (PDF)

After Vice City, San Andreas is the most popular game released by Grand Theft Auto (GTA). Usually GTA releases role playing game. San Andreas is such a game where you can act like a person. You can do everything. You have to take part in missions and complete them.  To make your missions easier, there are lots of cheat codes. If you can properly apply these codes, the tough parts of the game will be easier. Cheat codes are somewhat like keyboard shortcuts of computer programs.  I've shared 63 cheat codes below. There were more cheat codes in my collection, but I've omitted the less important cheats. Effects or result of the cheats are on the left side, and the codes are on the right side.  You can copy the following codes in your PC. And for your convenience, I've also uploaded a PDF file of these codes. You will find the download link at the bottom.  Effect Cheat Code Adrenaline Mode MUNASEF All Cars Explode ALL...

Rules for Bengali Typing in PDF (Bijoy Layout)

Bijoy is the most popular layout for Bangla typing. The layout was developed by Mostafa Jabbar. He is the pioneer of Bangla typing in computer. More than 90% people use his Bijoy layout for Bangla typing. Today, I'm gonna share a PDF file with you that contains the Bijoy Keyboard layout with English fonts! If your keyboard doesn't have bengali fonts then you can print this PDF file to know where the bengali fonts are located in your keyboard. Additionally this file contains all the necessary rules and tips which are essential for Bangla Typing.  Now there are many other software available for Bangla Typing Layout. Such as Avro Easy, Unicode, Unibijoy etc. And there rules are also somewhat different from Bijoy. And some of their layouts follow the same rules like Bijoy. Hopefully this PDF file will support most of the rules when a layout is similar to Bijoy Layout.  Click to enlarge the image Download the PDF file from the button below. Follow...

Office 2016 Activator (KMSPico 10.1.5)

It's been couple of months after the release of final version of Microsoft Office 2016. And maybe you're tired of finding for a working activator for this version. Today I'm gonna share Office 2016 activator with you - no more waiting!! About the Activator   Name: KMSPico 10.1.5 File Size: 3 MB (Approx) File Type: Zipped Folder 100% Neat & Clean - No virus! Activating Capacity . . . KMSPico 10.1.5 is successfully leading the KMS world for last few months. If everything is okay, success rate is 100%. This tool has been tested and verified by Marks PC Solution. With this tool, you can activate -  Office 2016, 2013 & 2010 Windows 10, 8.1 & 8 Hopefully this version will work for both 32 bit & 64 bit versions of Windows. Installing Office 2016 Collect/ Download Office 2016 Professional Plus from Microsoft or somewhere else. Install it as trial version without any key. Use the follow...